반응형
form 관련 기능 정리
- Thymeleaf의 form과 관련된 기능들을 정리해보고 이를 응용해 간단한 학생 등록, 조회 서비스 제작
form 태그 생성
- Controller에서 form을 호출할 때, Student 타입의 "student" 객체를 생성해 model을 통해 전달
<form action="/student/register" th:object="${student}" method="post">- form에서 th:object를 사용해 "student"를 전달 받음
- action, method를 사용함으로서 form을 submit 하면 POST /student/register 로 form 값이 전송되게 지정

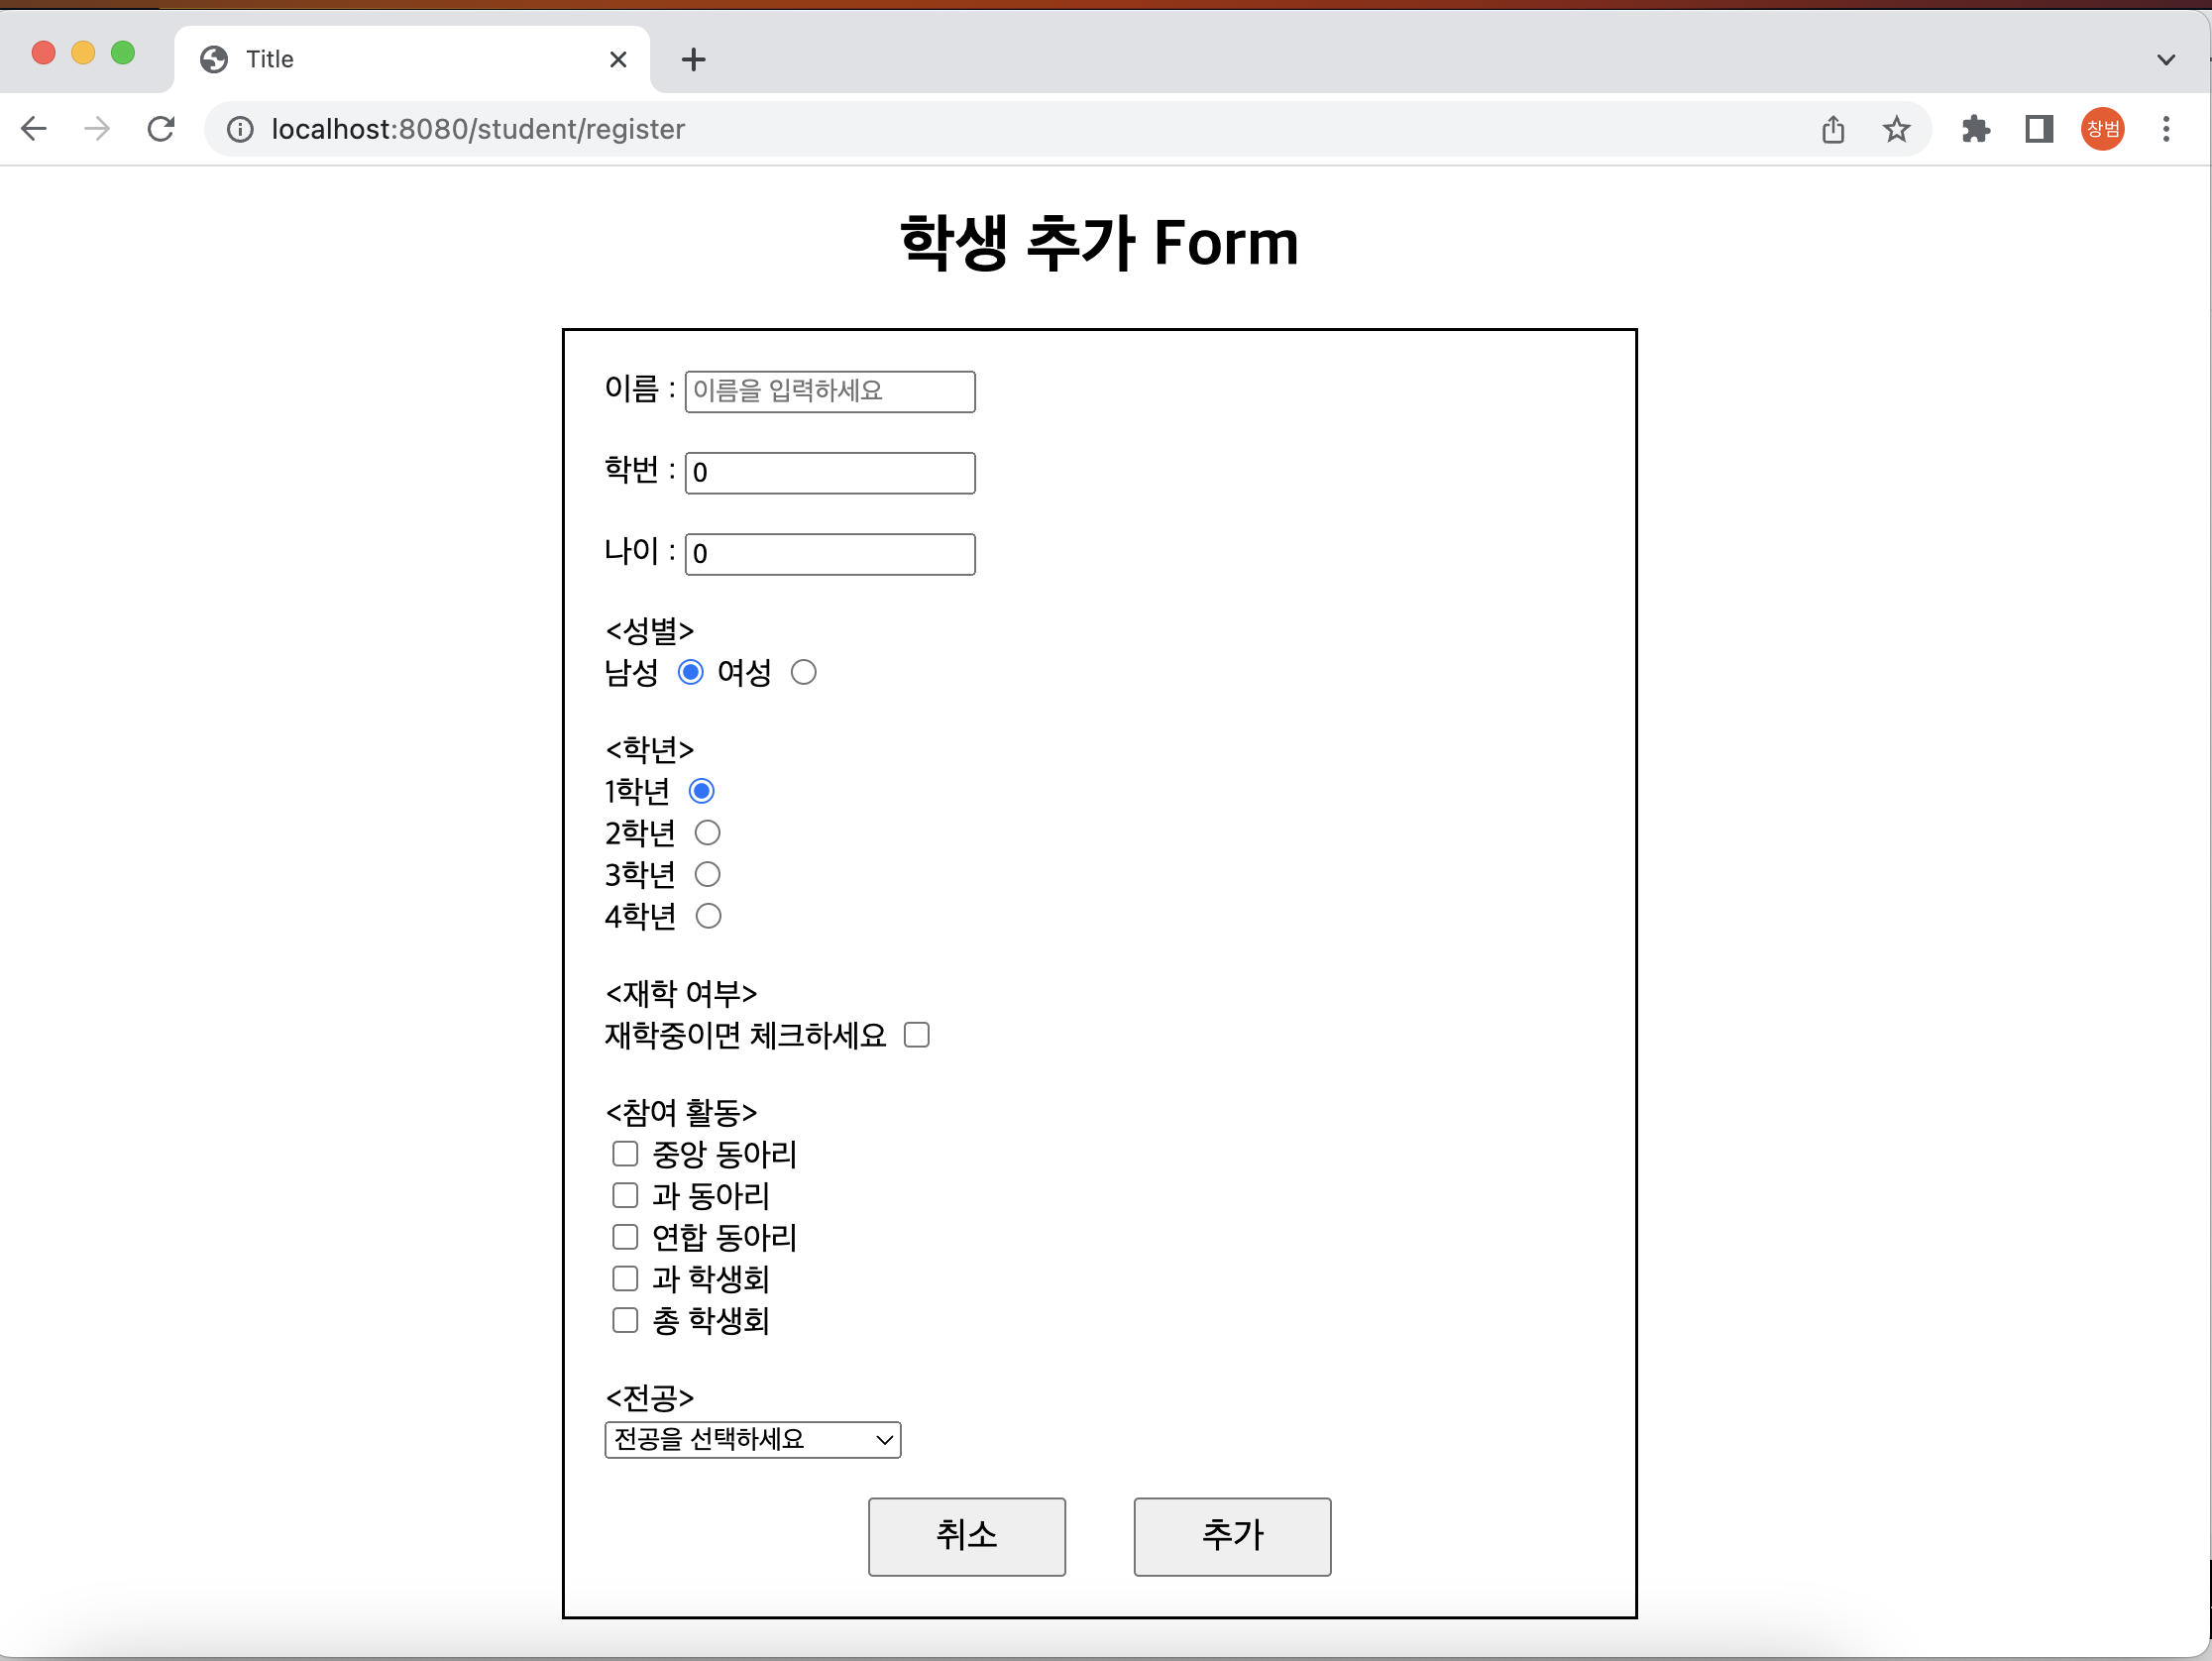
- 이 form을 만들 예정
th:field, input 태그로 이름, 학번, 나이 입력받기
<label th:for="name">이름 : </label>
<input type="text" th:field="*{name}" placeholder="이름을 입력하세요"/>- input 태그에서 th:field를 사용함으로써 여기에 입력되는 값이 student.name에 들어가게 됨
- 원래는 ${student.name}으로 받아야 함
- form태그에서 th:object를 해줬기 때문에 form이 student와 매핑되어서 *{name}만으로도 받을 수 있음
- th:field는 태그의 id, name을 자동으로 지정해주는 기능도 있음
- th:field="*{name}" => HTML의 id="name" name="name"으로 채워줌
- 학번, 나이는 숫자이기 대문에 type="number"로 해줌
성별 : radio button
<div><성별></div>
<div>
<label th:for="isMale">남성</label>
<input type="radio" th:field="*{isMale}" value="true"/>
<label th:for="isMale">여성</label>
<input type="radio" th:field="*{isMale}" value="false"/>
</div>- 성별은 남성, 여성 두가지 입력이 존재하고 하나만 선택할 수 있음
- radio button 사용
- Student의 isMale이 true이면 남성, false이면 여성으로 판단
- th:field를 똑같이 맞춰줘야 하나가 선택되면 다른 하나의 선택이 취소됨
- name이 같아짐
- id는 순서대로 자동 생성(밑에서 자세히 설명)
- 성별이 아무것도 선택되지 않을 수 있기때문에 Controller에서 student를 넘길 때, student.isMale 값을 true 혹은 false로 초기화 해줬음
학년 : radio button, ENUM 사용
- 학년도 성별과 마찬가지로 4개의 옵션 중 하나만 선택할 수 있어야 함
- radio button 사용
- 성별처럼 하나씩 해줘도 되지만 이번엔 ENUM을 사용해 봄
- enum 타입의 Grade를 먼저 생성해 줌
- name : Freshman, Sophomore, Junior, Senior
- description : 1학년, 2학년, 3학년, 4학년
public enum Grade {
    Freshman("1학년"), Sophomore("2학년"), Junior("3학년"), Senior("4학년");

    private final String description;

    Grade(String description) {
        this.description = description;
    }

    public String getDescription() {
        return description;
    }
}- 이제 Controller에서 성별과 마찬가지로 student.grade를 Grade.Freshman으로 초기화
- Contoller에서 넘길 때, "grades" 키값으로 Grade.values()를 넘겨줌
<div>
<div><학년></div>
<div th:each="grade : ${grades}">
<label th:for="${#ids.next('grade')}" th:text="${grade.description}"/>
<input type="radio" th:field="*{grade}" th:value="${grade.name()}"/>
</div>
</div>- Controller에서 보낸 "grades"를 반복문을 돌면서 th:text, th:value로 출력
th:field
- 학년을 화면에 출력할 때 #ids.next('grade')와 th:field="*{grade}"를 사용했음
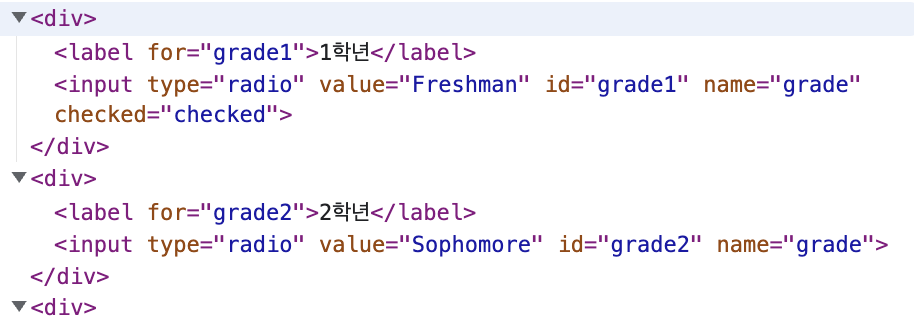
- 이렇게 해줬을 때 HTML에는 아래와 같이 매핑됨

- 위에서 보다시피 name은 모두 grade로 통일되어서 하나를 선택하면 같은 name을 가진 태그들의 선택이 취소됨
- id는 중복되면 안되기 때문에 "grade1", "grade2", ... 와 같이 자동으로 생성됨
- 위에서 했던 성별도 th:field를 사용했기 때문에 name은 같고, id는 순서대로 자동생성 되었음
#ids.next, #ids.prev
- th:field를 사용해서 input 태그들의 id가 자동으로 생성되었음
- label 태그의 for에는 #ids.next('grade')를 사용해 줬는데 뒤에 나오는 input 태그의 아이디와 같도록 자동으로 매핑됨
- 만약 input 태그가 label 태그 전에 나왔다면 #ids.prev('grade')를 써줬어야 함
재학 여부 : single checkbox
- checkbox는 radio button과 달리 여러개를 선택할 수 있음
- 재학 여부는 재학중이면 체크, 휴학중이면 체크하지 않는 방식으로 입력받음
- 굳이 checkbox를 사용하지 않아도 되지만 예시를 위해 사용해 봄
<div>
<div><재학 여부></div>
<div>
<label th:for="isAttending">재학중이면 체크하세요</label>
<input type="checkbox" th:field="*{isAttending}" />
</div>
</div>참여 활동 : multi checkbox
- 참여 활동의 종류는 임의로 선정
- 중앙동아리, 과동아리, 연합동아리, 과학생회, 총학생회
- 여러가지 활동을 동시에 할 수 있기 때문에 checkbox 사용
- 참여 활동 리스트(clubs)는 Controller에서 생성해서 보내줘야 함
<div>
<div><참여 활동></div>
<div th:each="club : ${clubs}">
<input type="checkbox" th:field="*{clubs}" th:value="${club.key}" />
<label th:for="${#ids.prev('clubs')}" th:text="${club.value}" />
</div>
</div>전공 : select
- 전공은 임의로 지정한 학과 중 선택해서 입력받는 형식
- 컴퓨터공학부, 기계공학부, 전자전기공학부
- 전공 리스트(majors)도 Controller에서 생성해서 보내줘야 함
<div>
<div><전공></div>
<select th:field="*{major}" style="width: 150px;">
<option value="">전공을 선택하세요</option>
<option th:each="major : ${majors}" th:value="${major}" th:text="${major}"/>
</select>
</div>- 여기까지 각각의 기능에 대해 설명했고 이제 전체 코드와 결과를 확인해보자
전체 코드
Student.java
- 학생 객체
@Data
public class Student {

    private int id;
    private String name;
    private int studentId;          // 학번
    private int age;
    private Boolean isMale;         // 성별 (true: 남성, false: 여성)
    private Grade grade;            // 학년
    private Boolean isAttending;    // 재학 여부
    private List<String> clubs;     // 참여 활동
    private String major;           // 전공
}
Grade.java
- 학년을 나타내는 enum class
public enum Grade {
    Freshman("1학년"), Sophomore("2학년"), Junior("3학년"), Senior("4학년");

    private final String description;

    Grade(String description) {
        this.description = description;
    }

    public String getDescription() {
        return description;
    }
}
RegisterForm.html
- 위에서 설명한 기능들을 모두 모아놓은 코드
- 학생 추가를 담당하는 페이지
<!DOCTYPE html>
<html lang="ko">
<html xmlns:th="http://www.thymeleaf.org">
<head>
<meta charset="UTF-8">
<title>Title</title>
</head>
<body align="center">
<h1>학생 추가 Form</h1>
<div align="center">
<form action="/student/register" th:object="${student}" method="post">
<div>
<label th:for="name">이름 : </label>
<input type="text" th:field="*{name}" placeholder="이름을 입력하세요"/>
</div> <br/>
<div>
<label th:for="studentId">학번 : </label>
<input type="number" th:field="*{studentId}"/>
</div> <br/>
<div>
<label th:for="age">나이 : </label>
<input type="number" th:field="*{age}"/>
</div> <br/>
<!-- radio button -->
<div><성별></div>
<div>
<label th:for="isMale">남성</label>
<input type="radio" th:field="*{isMale}" value="true"/>
<label th:for="isMale">여성</label>
<input type="radio" th:field="*{isMale}" value="false"/>
</div> <br/>
<div>
<div><학년></div>
<div th:each="grade : ${grades}">
<label th:for="${#ids.next('grade')}" th:text="${grade.description}"/>
<input type="radio" th:field="*{grade}" th:value="${grade.name()}"/>
</div>
</div> <br/>
<!-- single checkbox -->
<div>
<div><재학 여부></div>
<div>
<label th:for="isAttending">재학중이면 체크하세요</label>
<input type="checkbox" th:field="*{isAttending}" />
</div>
</div> <br/>
<!-- multi checkbox -->
<div>
<div><참여 활동></div>
<div th:each="club : ${clubs}">
<input type="checkbox" th:field="*{clubs}" th:value="${club.key}" />
<label th:for="${#ids.prev('clubs')}" th:text="${club.value}" />
</div>
</div> <br/>
<!-- select -->
<div>
<div><전공></div>
<select th:field="*{major}" style="width: 150px;">
<option value="">전공을 선택하세요</option>
<option th:each="major : ${majors}" th:value="${major}" th:text="${major}"/>
</select>
</div> <br/>
<div align="center">
<button type="button" th:onclick="|location.href='@{/student/}'|">취소</button>
<button type="submit" style="margin-left: 30px">추가</button>
</div>
</form>
</div>
</body>
</html>
<style>
form {
border: black;
border-style: solid;
width:500px;
text-align: left;
padding: 20px;
}
button {
height: 40px;
width: 100px;
font-size: large;
}
</style>StudentInfo.html
- 추가한 학생의 정보를 확인할 수 있는 페이지
- RegisterForm에서는 입력을 받았다면 StudentInfo는 출력을 해줌
<!DOCTYPE html>
<html lang="ko">
<html xmlns:th="http://www.thymeleaf.org">
<head>
<meta charset="UTF-8">
<title>Title</title>
</head>
<body align="center">
<h1>학생 세부 정보</h1>
<div align="center">
<div class="form-style">
<div th:text="'이름 : ' + ${student.name}"/> <br/>
<div th:text="'학번 : ' + ${student.studentId}"/> <br/>
<div th:text="'나이 : ' + ${student.age}"/> <br/>
<div th:if="${student.isMale == true}" th:text="'성별 : 남성'" />
<div th:unless="${student.isMale == true}" th:text="'성별 : 여성'" />
<br/>
<div th:text="'학년 : ' + ${student.grade.description}"/> <br/>
<div th:if="${student.isAttending == true}" th:text="'재학 여부 : 재학중'" />
<div th:unless="${student.isAttending == true}" th:text="'재학 여부 : 휴학중'" />
<br/>
<div>
<div><참여활동></div>
<div th:each="club : ${clubs}">
<input type="checkbox" th:field="${student.clubs}" th:value="${club.key}" disabled />
<label th:for="${#ids.prev('clubs')}" th:text="${club.value}"/>
</div>
</div>
<br/>
<div th:text="'전공 : ' + ${student.major}" /> <br/>
<div align="center">
<button type="button" th:onclick="|location.href='@{/student/}'|">뒤로가기</button>
</div>
</div>
</div>
</body>
</html>
<style>
.form-style {
border: black;
border-style: solid;
width:500px;
text-align: left;
padding: 20px;
}
button {
height: 40px;
width: 100px;
font-size: large;
}
</style>StudentList.html
- 홈 화면이자 전체 학생 목록을 볼 수 있는 페이지
<!DOCTYPE html>
<html lang="ko">
<html xmlns:th="http://www.thymeleaf.org">
<head>
    <meta charset="UTF-8">
    <title>Title</title>
</head>
<body>
    <h1>전체 학생 리스트</h1>
    <div>
        <button type="button" th:onclick="|location.href='@{/student/register}'|">학생 추가</button>
    </div> <br/>

    <div align="center">
        <table>
            <thead>
            <tr>
                <th style="width: 50px;">ID</th>
                <th style="width: 150px;">학번</th>
                <th style="width: 100px;">이름</th>
                <th style="width: 200px">세부 정보</th>
            </tr>
            </thead>
            <tbody>
            <tr th:each="student : ${students}">
                <td th:text="${student.id}"/>
                <td th:text="${student.studentId}"/>
                <td th:text="${student.name}"/>
                <td>
                    <button type="button" th:onclick="|location.href='@{/student/{Id}(Id=${student.id})}'|"
                            style="width: auto">
                        세부 정보 보기
                    </button>
                </td>
            </tr>
            </tbody>
        </table>
    </div>
</body>
</html>
<style>
table{
    border-style: solid;
    border-color: black;
    width: 500px;
    text-align: center;
}
button {
    height: 40px;
    width: 100px;
    font-size: large;
}
</style>
StudentRepository
- Service를 따로 안 만들고 Repository에서 비지니스 로직, DB 접근 병행
- students라는 Map을 사용해 DB 대체
@Repository
public class StudentRepository {

    private Map<Integer, Student> students = new HashMap<>();
    private int sequence = 0;

    public int save(Student student) {
        student.setId(++ sequence);
        students.put(student.getId(), student);
        return student.getId();
    }

    public Student findById(int id) {
        return students.get(id);
    }

    public List<Student> findAll() {
        return new ArrayList<>(students.values());
    }
}
StudentController
- Controller
- 참고 : HTML 파일들이 resources/templates/thymeleaf_form 에 있음
@Controller
@RequestMapping("/student")
@RequiredArgsConstructor
public class StudentController {

    private final StudentRepository studentRepository;

    @GetMapping("")
    public String home(Model model) {
        model.addAttribute("students", studentRepository.findAll());
        return "thymeleaf_form/StudentList";
    }

    @GetMapping("/register")
    public String registerForm(Model model) {
        Student student = new Student();
        student.setIsMale(  true);
        student.setGrade(Grade.Freshman);
        model.addAttribute("student", student);
        model.addAttribute("grades", Grade.values());

        Map<Integer, String> clubs = new LinkedHashMap<>();
        clubs.put(1, "중앙 동아리");
        clubs.put(2, "과 동아리");
        clubs.put(3, "연합 동아리");
        clubs.put(4, "과 학생회");
        clubs.put(5, "총 학생회");
        model.addAttribute("clubs", clubs);

        List<String> majors = new ArrayList<>();
        majors.add("컴퓨터공학부");
        majors.add("기계공학부");
        majors.add("전자전기공학부");
        model.addAttribute("majors", majors);

        return "thymeleaf_form/RegisterForm";
    }

    @PostMapping("/register")
    public String registerStudent(@ModelAttribute Student student) {
        studentRepository.save(student);
        return "redirect:/student";
    }

    @GetMapping("/{id}")
    public String studentInfo(@PathVariable int id, Model model) {
        model.addAttribute("student", studentRepository.findById(id));
        System.out.println(studentRepository.findById(id));

        Map<Integer, String> clubs = new LinkedHashMap<>();
        clubs.put(1, "중앙 동아리");
        clubs.put(2, "과 동아리");
        clubs.put(3, "연합 동아리");
        clubs.put(4, "과 학생회");
        clubs.put(5, "총 학생회");
        model.addAttribute("clubs", clubs);

        return "thymeleaf_form/StudentInfo";
    }
}
결과
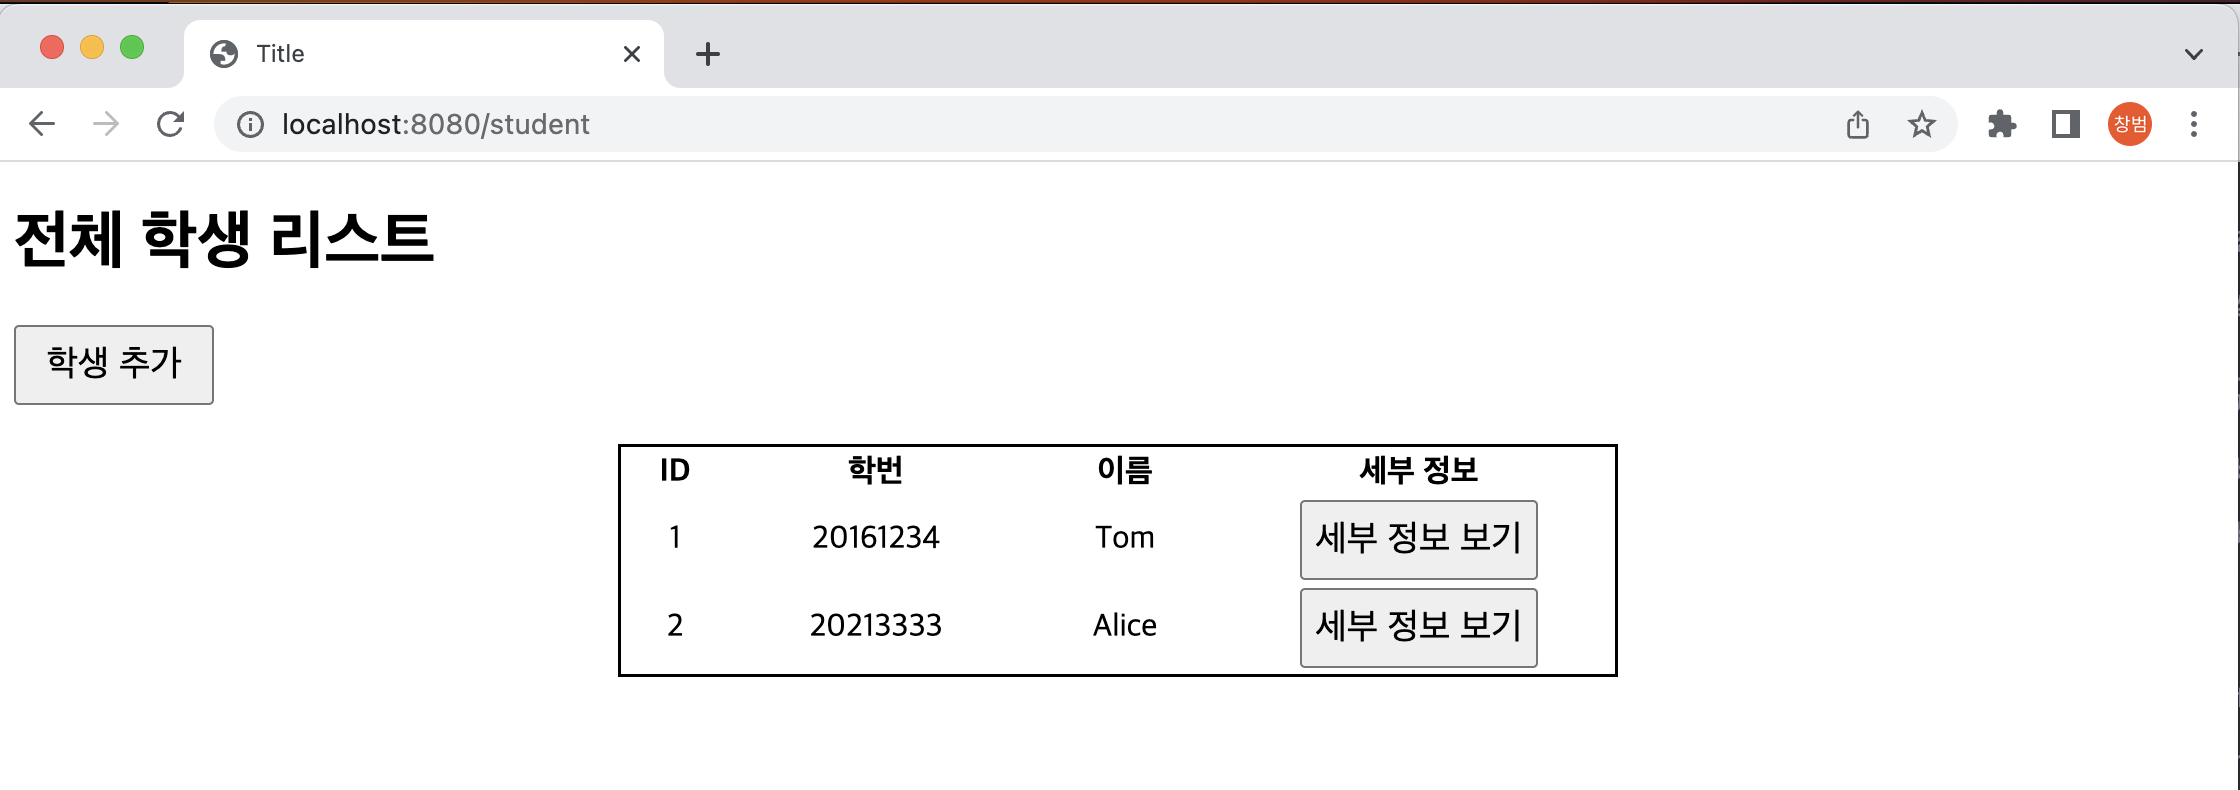
- 홈 화면이자 전체 학생 리스트 (아무것도 추가하지 않았을 때)

- 학생 추가 화면

- 학생 추가 결과

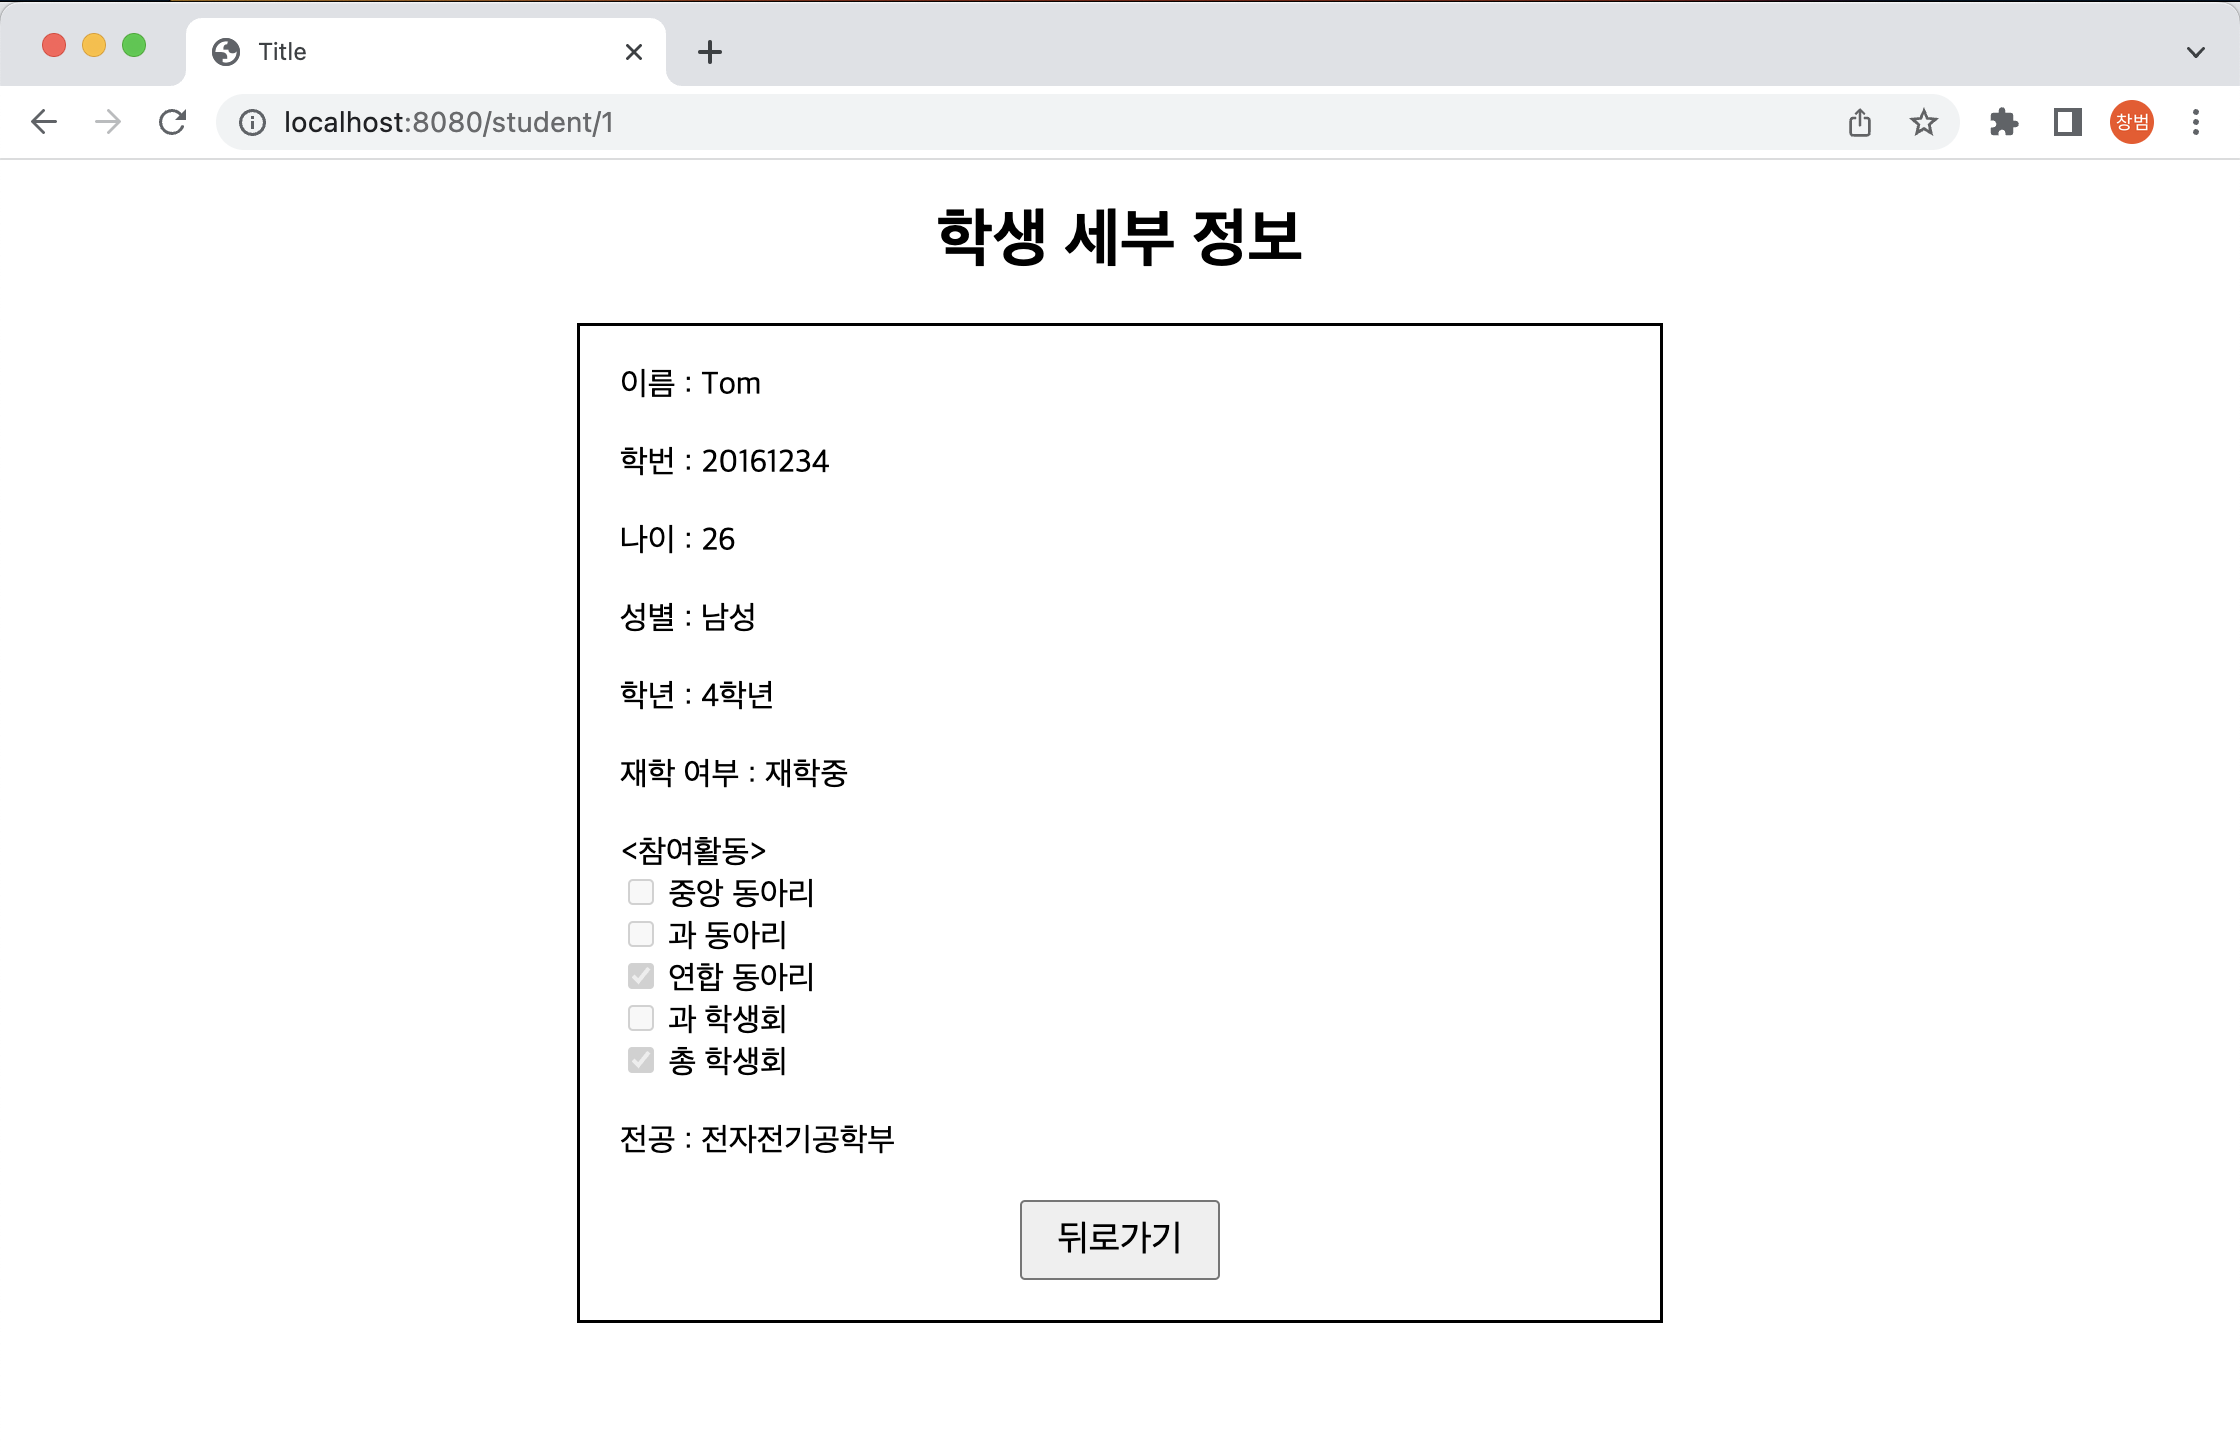
- 학생 세부 정보

반응형
'Spring Boot > 문법 정리' 카테고리의 다른 글
| [Spring Boot] Validation, 에러메세지 설정방법 (2) | 2022.06.11 |
|---|---|
| [Spring Boot] Thymeleaf - 메세지, 국제화 (0) | 2022.06.10 |
| [Spring Boot] Thymeleaf 기능 정리 (0) | 2022.06.04 |
| [Spring Boot] DI, @Autowired, @RequiredArgsConstructor (0) | 2022.05.17 |
| [Spring Boot] 테스트 코드 작성 예제 (0) | 2022.05.12 |