반응형
Thymeleaf 란?
- 템플릿 엔진 중 하나로 HTML 태그를 기반으로 th:속성을 추가해 동적인 View를 제공
- 쉽게 배울 수 있고 Spring과의 연동이 좋기 때문에 백엔드 개발자가 배워두면 좋음
사용 방법
- dependency에 thymeleaf 라이브러리 추가
implementation 'org.springframework.boot:spring-boot-starter-thymeleaf'- HTML 파일에 아래 코드 추가
<html xmlns:th="http://www.thymeleaf.org">기능 정리
Controller에서 HTML 페이지로 값 전송
@GetMapping("/hello")
public String hello(Model model) {
    model.addAttribute("data", "Hello");
    return "thymeleaf_basic/hello";
}- 위와 같이 model을 HTML 페이지로 보낼 수 있음
- model.addAttribute("Key", "Value") 형식으로 model에 data를 담아 전송 가능
- value로는 int, String 뿐 아닌 Object도 전송 가능
- 위와 같이 return하면 templates/thymeleaf_basic/hello.html에 model을 가지고 감
HTML 페이지에서 값 받기
- Controller에서 Model을 통해 data를 전송했음
- 이를 받기 위해서는 HTML파일에서 ${Key}로 Value 값을 받을 수 있음
텍스트 관련 => th:text, [[ ]]
- Controller에서 위와 같이 "data"라는 Key로 "Hello"라는 Value 값을 전송했다고 가정
<div th:text="${data}">Hi</div>
<div>[[${data}]]</div>- 첫번째 줄 코드는 "Hi"를 출력하는 div 태그이지만 th:text에 있는 값으로 대체함
- ${data}가 Controller에서 전송했던 "Hello"로 바뀌어서 화면에는 "Hello"가 출력됨
- 두번째 줄 코드는 th:text를 사용하지 않고 직접 data값을 쓰고 싶을 때 사용하는 방법
텍스트 관련 2 => th:utext, [( )]
- 만약 Controller에서 "data"라는 Key에 HTML 태그를 넣어서 전송한 경우
- th:text, [[ ]] 이 두 방법으로 값을 받으면 태그로 인식하지 않고 String으로 인식함
- 만약 data 안에 있는 태그를 태그로 인식하고 싶다면 th:utext, [( )] 를 사용
  <div th:text="${data}"></div>
  <hr>
  <div>[[${data}]]</div>
  <hr>
  <div th:utext="${data}"></div>
  <hr>
<div>[(${data})]</div>- 결과

객체 받기
- 만약 Controller에서 User 타입의 user 객체를 전송했다면 thymeleaf로는 ${user}로 객체를 받을 수 있음
- 만약 user의 name 값을 받고 싶다면 아래와 같이 받을 수 있음 (세 가지 방법 모두 같은 결과)
- 주의할 점은 User 객체의 name에 getter가 있어야 함
<div th:text="${user.name}"></div>
<div th:text="${user.getName()}"></div>
<div th:text="${user['name']}"></div>
날짜 관련 => #temporals
- 만약 Controller에서 LocalDateTime.now() 를 통해 날짜값이 전송했다면 다음과 같이 받으면 됨
<div th:text="${localDateTime}"></div>- 이 때, thymeleaf에서 제공하는 #temporals 을 통해 다양한 기능 사용 가능
  <div th:text="${#temporals.format(localDateTime, 'yyyy-MM-dd HH:mm:ss')}"></div>

  <div th:text="${#temporals.year(localDateTime)}"></div>
  <div th:text="${#temporals.month(localDateTime)}"></div>
  <div th:text="${#temporals.dayOfWeek(localDateTime)}"></div>
  <div th:text="${#temporals.hour(localDateTime)}"></div>
연산 기능
<div th:text="10 + 2"></div>
<div th:text="'10 + 2'"></div>- 첫번째 줄은 12가 출력되고, 두번째 줄은 10 + 2 가 출력됨
- +, -, *, /, %, >, >=, gt, ==, != 등의 연산 가능
- 문자열로 인식하게 하고 싶다면 ' '로 감싸줘야 됨.
- 문자열 중간에 띄어쓰기가 없고 연산이 없으면 문자열로 인식하긴 하지만 복잡하니 웬만하면 ' '로 감싸주자
리터럴 => | |
- 만약 "Hello 유저명!" 식으로 출력하고 싶다면, 리터럴 대체 문법( | | )을 사용할 수 있음 (아래 둘은 같은 결과)
<div th:text="'hello ' + ${user.name} + '!'"></div>
<div th:text="|hello ${user.name}!|"></div>
URL 이동 관련 (+ parameter 전송) => th:href
- localhost:8080에서 실행되고 있다고 가정
- 아래의 a태그를 클릭하면 localhost:8080/main으로 이동
<a th:href="@{/main}">메인으로</a>- 아래의 a태그를 클릭하면 p1, p2 값이 각각 Query Parameter로 전송됨
- localhost:8080/main?p1=p1값&p2=p2값으로 이동
<a th:href="@{/main(p1=${p1}, p2=${p2})}">query parameter</a>- 아래의 a태그를 클릭하면 p1, p2 값이 각각 Path Variable로 전송됨
- localhost:8080/main/{p1값}/{p2값}
<a th:href="@{/main/{p1}/{p2} (p1=${p1}, p2=${p2})}">path variable</a>- 위 둘을 섞어서 아래와 같이도 사용가능
<a th:href="@{/main/{p1} (p1=${p1}, p2=${p2})}">path variable + query parameter</a>반복문 => th:each
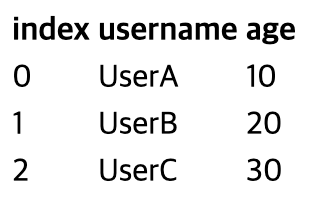
- Controller에서 다음과 같이 users라는 User객체의 List를 전송했다고 가정
@GetMapping("/loop")
public String Loop(Model model) {
    List<User> list = new ArrayList<>();
    list.add(new User("UserA", 10));
    list.add(new User("UserB", 20));
    list.add(new User("UserC", 30));

    model.addAttribute("users", list);
    return "loop";
}

@Data
@AllArgsConstructor
class User {
    private String username;
    private int age;
}- 아래와 같이 th:each를 통해 반복문을 돌릴 수 있음
- 넘어온 data들을 user로 하나씩 받았기 때문에 userStat을 활용해 count, size, index, odd, even, current 등의 기능 사용 가능
<table>
    <tr>
        <th>index</th>
        <th>username</th>
        <th>age</th>
    </tr>
    <tr th:each="user : ${users}">
        <td th:text="${userStat.index}"></td>
        <td th:text="${user.username}"></td>
        <td th:text="${user.age}"></td>
    </tr>
</table>- 결과
th:block 태그
- 별도의 HTML 태그 없이 th:each, th:switch 등을 사용할 수 있게 해주는 thymeleaf의 태그
<th:block th:each="user : ${users}">
    <div>
        사용자 이름 : <span th:text="${user.username}"></span>
        사용자 나이 : <span th:text="${user.age}"></span>
    </div>
    <div>
        요약 <span th:text="${user.username} + ' / ' + ${user.age}"></span>
    </div>
</th:block>
조건문 => th:if, th:unlesss
<span th:text="'미성년자'" th:if="${user.age < 20}"></span>
<span th:text="'성인'" th:unless="${user.age < 20}"></span>
주석
<!-- <div>1</div> -->
<!--/*--> <div>2</div> <!--*/-->
<!--/*/ <div>3</div> /*/-->- 다음과 같이 3가지 종류의 주석이 있음
- 1번 주석은 HTML 기본 주석
- 2번 주석은 parser 주석으로 thymeleaf를 통해 페이지를 열었을 때만, 주석으로 인식
- 3번 주석은 prototype 주석으로 thymeleaf를 통해 페이지를 열었을 때만 주석으로 인식 X
자바스크립트 인라인 => th:inline
- script 태그 사용시 다음과 같이 사용하면 조금 더 편리하게 사용 가능
<script th:inline="javascript">
    var username = [[${user.username}]];
    var age = [[${user.age}]];

    //객체
    var user = [[${user}]];
</script>
화면 구성 => th:fragment, th:insert, th:replace
- 홈페이지를 개발하는데 모든 페이지에 완전히 똑같은 footer을 둬야된다고 가정
- 모든 페이지에 똑같은 코드를 반복하는 것은 매우 비효율적
- 푸터를 아래와 같이 한번 만들어 놓음 (footer.html)
<!DOCTYPE html>
<html xmlns:th="http://www.thymeleaf.org">

<body>
<footer th:fragment="footer1">
    푸터
</footer>

<footer th:fragment="footer2 (param1)">
    <p>파라미터 사용 푸터</p>
    <p th:text="${param1}"></p>
</footer>

</body>
</html>
<div th:insert="~{fragment/footer :: footer1}"></div>
<div th:replace="~{fragment/footer :: footer1}"></div>
<div th:replace="fragment/footer :: footer1"></div>- 첫번째 줄은 div태그 사이에 footer을 가져와서 넣어줌
- 두번째 줄은 div태그를 footer태그로 바꿔줌
- 세번째 줄은 부분포함식을 조금 더 간단하게 표현한 것으로 두번째 줄과 기능은 같음
<div th:replace="~{fragment/footer :: footer2 ('Page1')}"></div>
<div th:replace="fragment/footer :: footer2 ('Page2')></div>- 파라미터 전송이 필요한 경우에는 다음과 같이 전송
- 이를 활용해서 html 태그에 replace를 사용한다면 Layout으로 활용도 가능
반응형
'Spring Boot > 문법 정리' 카테고리의 다른 글
| [Spring Boot] Thymeleaf - 메세지, 국제화 (0) | 2022.06.10 |
|---|---|
| [Spring Boot] Thymeleaf - form 관련 기능 정리 (1) | 2022.06.09 |
| [Spring Boot] DI, @Autowired, @RequiredArgsConstructor (0) | 2022.05.17 |
| [Spring Boot] 테스트 코드 작성 예제 (0) | 2022.05.12 |
| [Spring Boot] @RestController, lombok (0) | 2022.04.29 |